· Priya Nair · Engineering · 10 min read
PCB Assembly Cost Breakdown
Understand what drives PCB assembly costs: component placement, solder paste, reflow profiles, inspection, and test. Detailed cost breakdown with optimization strategies for prototype and production volumes.
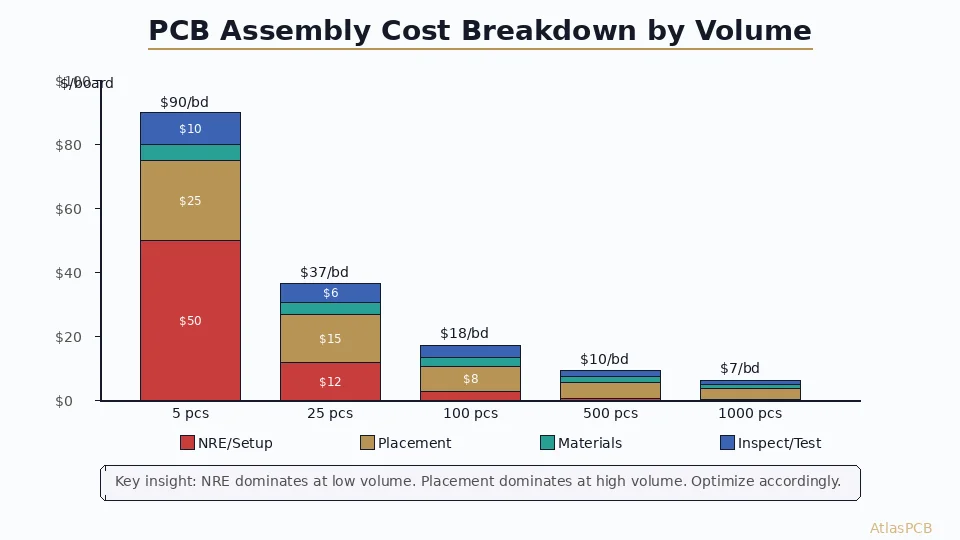
Quick Answer
PCB assembly cost breaks down into four main buckets: setup and NRE (stencil, programming, fixture) at $150-500 per order; component placement at $0.01-0.05 per placement for SMT and $0.03-0.10 for through-hole; materials (solder paste, flux, consumables) at 3-5% of BOM cost; and inspection/test (AOI, X-ray, ICT/flying probe) at $0.50-5.00 per board. For a typical 200-component board at 100-piece quantity, expect $8-15 per board in assembly cost excluding component BOM. Optimization focuses on reducing unique part numbers (fewer feeder changes), standardizing package sizes, and designing for single-side placement where possible.
Quick Reference: Assembly Cost Ranges by Volume
| Volume | NRE (per order) | Assembly (per board, 200 placements) | Total per board |
|---|---|---|---|
| 1-5 prototypes | $200-400 | $40-80 | $80-120 |
| 25 pieces | $200-400 | $15-30 | $23-46 |
| 100 pieces | $200-400 | $8-15 | $10-19 |
| 500 pieces | $300-500 | $5-10 | $5.60-11 |
| 1,000+ pieces | $300-500 | $3-7 | $3.30-7.50 |
These ranges assume standard SMT technology (0402 minimum, 0.5mm pitch minimum IC), lead-free process, single-sided placement with AOI inspection. Double-sided assembly adds 60-100%. BGA or micro-BGA components add X-ray cost.
Understanding Assembly Cost Structure
PCB assembly pricing confuses engineers because the cost structure is fundamentally different from bare board fabrication. Bare boards scale linearly with area and layer count—straightforward engineering. Assembly cost, by contrast, is dominated by time-based operations (machine hours), one-time setup charges (stencils, programming), and volume-dependent material waste. Understanding which bucket dominates at your specific volume determines where optimization effort is productive.
At prototype volumes (1-25 boards), NRE charges dominate. The stencil costs the same whether you build 1 board or 25. Machine programming (teaching the pick-and-place feeder positions, developing the reflow profile, setting up AOI programs) takes 2-4 hours regardless of batch size. This fixed cost, divided by a small number of boards, makes prototype assembly feel expensive—$50-100 per board for assembly alone is normal for complex designs.
At production volumes (500+), per-placement cost and material costs dominate. The NRE is amortized to negligibility, and cost reduction shifts to: reducing total placement count, minimizing feeder changes between boards in a batch, eliminating manual operations (hand-soldering, manual inspection), and achieving high first-pass yield to avoid rework labor. A 1% improvement in first-pass yield at 1000+ volume saves more money than any NRE reduction.
NRE and Setup Costs: What You Pay Once
The non-recurring engineering charges for PCB assembly typically include the following elements, though assemblers package them differently in their quotes:
Stencil fabrication ($30-200): Required for SMT solder paste application. The stencil is a thin stainless steel sheet (typically 100-150um thick) with laser-cut apertures matching your SMD pad geometry. Standard thickness is 120um for mixed assemblies; 100um for fine-pitch BGAs below 0.4mm pitch; 150um for large thermal pads and power components. The stencil cost is a fixed charge regardless of board count, making it significant for prototypes and trivial for production.
Pick-and-place programming ($50-150): The placement machine needs feeder slot assignments, component rotation data, and placement coordinates. For boards previously assembled, this program already exists. For new designs, expect 1-3 hours of programming time depending on component count and package variety. Some assemblers include this in their board price; others break it out as a line item.
Reflow profile development ($50-100): Every unique board design requires a validated thermal profile ensuring all solder joints reach liquidus (217C for SAC305) without exceeding component or laminate temperature limits. Complex boards with mixed thermal mass (large ground planes adjacent to thermally sensitive components) may require multiple profile iterations. Once developed, the profile is stored for repeat orders.
Test fixture NRE ($2,000-8,000 for ICT): Only applicable if you select in-circuit test. The fixture contains spring-loaded probes (pogo pins) that contact test points on the assembled board. Fixture cost is driven by probe count and board complexity. For prototypes and low volumes, flying probe test eliminates this NRE entirely at the cost of slower per-board throughput.
TURNKEY PCBA
Get Assembly Pricing With Your Bare Board Quote
Upload Gerber files plus BOM for combined fabrication and assembly pricing. NRE, placement, and inspection costs itemized.
Upload BOM + Gerber ›
Per-Placement Cost: Where Machine Time Drives Price
The per-placement cost is the most variable element of assembly pricing because it depends on component type, package size, machine capability, and volume-driven throughput optimization. Modern high-speed chip shooters (Yamaha YSM40R, Fuji NXT III) place standard passives at 40,000-80,000 components per hour. Fine-pitch ICs require slower, more accurate heads running at 3,000-8,000 placements per hour. This speed difference directly translates to cost difference.
Standard passives (0201-1206 resistors, capacitors, inductors): These are the bread and butter of high-speed placement. The machine picks multiple components simultaneously (4-8 nozzle heads) and places them with plus/minus 30-50um accuracy at full speed. Cost: $0.005-0.015 per placement at production volumes. At these prices, component count optimization offers minimal savings—100 extra 0402 capacitors add only $0.50-1.50 per board.
Fine-pitch ICs (QFP 0.5mm pitch, BGA 0.8mm pitch): The placement machine slows down significantly for these components, using vision alignment and single-nozzle placement. A 144-pin TQFP takes 3-5 seconds to place versus 0.5 seconds for a passive. Cost: $0.02-0.05 per placement, driven by machine time and the precision requirement.
Micro-BGA and ultra-fine-pitch (0.3-0.4mm pitch): These require the machine’s highest accuracy mode (plus/minus 15-25um), vision-assisted placement, and often flux dipping before placement. Some assemblers charge a premium per component: $0.10-0.50 per micro-BGA placement, plus mandatory X-ray inspection after reflow.
Through-hole components: Manual insertion costs $0.05-0.10 per pin in low volumes. Automated through-hole (axial/radial inserters) brings this down to $0.02-0.04 per pin but requires specific component packaging (tape-and-ammo). Selective wave soldering after insertion adds $0.10-0.30 per board. If your design has fewer than 10 through-hole components, hand soldering is typically more economical than setting up automated insertion.
Materials and Process Costs
Assembly materials are often overlooked in cost estimations but represent 3-8% of the total assembly cost depending on process complexity.
Solder paste is the primary consumable, consumed at approximately 0.5-1.5 grams per board for a typical 50x100mm assembly. SAC305 lead-free paste costs $80-120 per 500g jar, making material cost $0.08-0.36 per board at standard application rates. Low-silver alloys (SAC105, SN100C) save 20-30% on paste cost for applications that tolerate slightly lower fatigue resistance. For high-reliability or automotive assemblies, specialty pastes (indium-bearing, high-temperature) can reach $200-400 per jar.
Flux for wave soldering and selective soldering adds $0.02-0.10 per board depending on the flux type (no-clean, water-soluble, rosin) and application method. No-clean flux is standard and eliminates post-soldering wash steps, saving $0.30-1.00 per board in cleaning cost.
Adhesive for double-sided reflow is required when large or heavy components on the bottom side might fall during second-side reflow. UV-curable or thermally-cured epoxy dots cost $0.01-0.03 per component and add a process step (dispensing + curing) that increases cycle time by 15-30 seconds per board.
Inspection and Test: The Quality Cost Trade-off
Quality assurance costs are the most debated line items in assembly quotes because they are technically optional—you can ship uninspected boards—but the cost of a field failure far exceeds the cost of detection. The engineer’s job is selecting the minimum inspection level that achieves the target defect rate for the application.
Visual inspection (manual): $0.50-2.00 per board. An operator inspects solder joints under magnification, checking for bridges, insufficient solder, tombstoned components, and placement errors. Suitable for simple boards with fewer than 50 placements. At higher component counts, operator fatigue makes manual inspection unreliable after 30-50 boards per shift.
AOI (Automated Optical Inspection): $0.20-0.50 per board at production volumes. Cameras and pattern-matching algorithms inspect every solder joint in 5-15 seconds per board. AOI catches 95%+ of visible defects (bridges, opens, tombstones, wrong polarity) but cannot see hidden joints (BGA, QFN center pads). Essentially mandatory for any board with more than 100 placements or any fine-pitch component.
X-ray inspection: $1-5 per board for selective inspection, $5-20 for 100% BGA inspection. Required for any BGA, QFN with exposed pad, or LGA package where solder joints are hidden beneath the component body. The X-ray reveals voids, bridges, head-on-pillow defects, and insufficient solder that are completely invisible to AOI. Budget X-ray for any board with BGA packages.
In-Circuit Test (ICT): $0.50-2.00 per board (after $2,000-8,000 fixture NRE). Probes contact test points and verify component values, shorts, opens, and basic functionality. Excellent for production volumes above 500 where the fixture cost is amortized. ICT catches wrong-value components that visual inspection and AOI cannot detect (a 10K resistor looks identical to a 100K resistor on camera).
Flying probe test: $3-10 per board, no fixture required. Movable probes contact test points sequentially. Slower than ICT but eliminates fixture NRE. Ideal for prototype and low-volume production (under 200 boards). Detects the same fault types as ICT with 3-5x longer test time per board.
FULL INSPECTION CAPABILITY
AOI, X-ray, and Flying Probe Testing
IPC-A-610 Class 2 and Class 3 workmanship standards. 100% AOI on every production board.
View Full Capabilities ›Design Optimization Strategies That Reduce Assembly Cost
The most effective assembly cost reductions are made at the design stage, not during purchasing negotiations. These strategies require zero additional component cost and minimal design effort.
Consolidate passive values. Every unique component value requires a separate feeder slot on the pick-and-place machine. Reducing from 60 unique resistor values to 35 by using standard E24/E48 preferred values and accepting plus/minus 5% tolerance saves 25 feeder changes per setup. At $2-3 per feeder change in setup time, this saves $50-75 per batch—significant for repeat production.
Standardize on fewer package sizes. Using 0402 for all passives (instead of mixing 0201, 0402, 0603, and 0805) allows the machine to use fewer nozzle types and optimize placement speed. If your design permits, standardize on the largest acceptable package size—the machine places 0402 and 0603 at the same speed, but 0201 requires slower placement and higher accuracy.
Design for single-sided assembly. Moving all components to one side eliminates the second stencil, second reflow pass, and adhesive requirements. For boards with fewer than 20 passives on the bottom side, a slightly larger board with single-sided placement almost always costs less to assemble than a smaller double-sided design.
Panel for assembly efficiency. Work with your assembler to determine optimal panelization. A 2-up panel halves the number of stencil prints and oven passes. A 4-up panel quarters them. The bare board cost increases slightly for larger panels, but assembly savings typically outweigh this at volumes above 50 boards. Include fiducial marks and tooling holes in your panel design for automatic alignment.
Add test points during layout. If ICT or flying probe test is planned, adding 0.040” (1.0mm) test pads on a 2.54mm grid during layout costs nothing in fabrication but enables $0.50-2.00 per board savings versus functional test at higher volumes. Test points on the bottom side opposite BGA locations allow verification without probing the component side.
ATLASPCB
Get Your Assembly Quote in 24 Hours
Upload Gerber files and BOM for detailed assembly pricing. We itemize NRE, placement, inspection, and material costs so you know exactly where your money goes.
Get Instant Quote ›
Related Reading:
About AtlasPCB — We specialize in complex PCB manufacturing for HDI, RF, and high-reliability applications. Explore our PCB assembly services, instant online PCB quote, or get an full PCB manufacturing capabilities . Every order includes free engineering review. Get your quote.
Reviewed by AtlasPCB Engineering Team — IPC-certified manufacturing specialists with 15+ years of production experience in HDI, RF, and high-reliability PCB fabrication. Content based on factory floor data and real customer design reviews.
Frequently Asked Questions
What is the typical cost per SMT placement?
How much does a PCB assembly stencil cost?
When does double-sided assembly significantly increase cost?
What inspection and test costs should I budget?
How do I optimize assembly cost without changing my design?
- PCB assembly cost
- PCBA pricing
- SMT assembly
- PCB manufacturing cost
- BOM optimization
- assembly quote